How to Deploy AI Models on Kubernetes
Complete guide to containerizing and deploying AI models using Kubernetes.
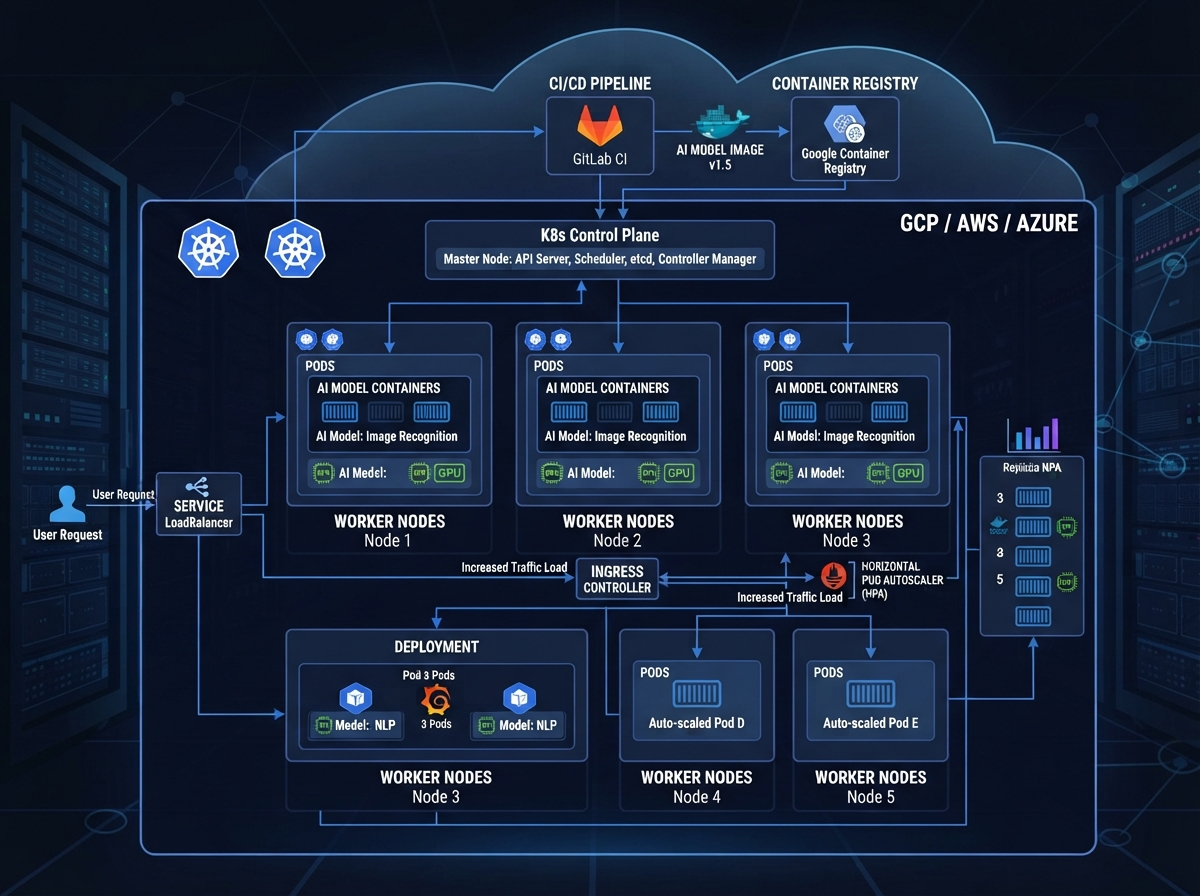
Kubernetes provides scalable, reliable deployment for AI models. This guide walks you through the entire deployment process.
Prerequisites
- Docker experience
- Kubernetes basics understanding
- kubectl installed
- Access to Kubernetes cluster (local or cloud)
Step 1: Containerize Your Model
Create a Dockerfile:
FROM python:3.11-slim

WORKDIR /app

# Install dependencies
COPY requirements.txt .
RUN pip install --no-cache-dir -r requirements.txt

# Copy model and code
COPY model.pth .
COPY app.py .

# Expose port
EXPOSE 8000

# Run application
CMD ["python", "app.py"]
Create your FastAPI application:
# app.py
from fastapi import FastAPI
import torch
from pydantic import BaseModel

app = FastAPI()

# Load model
model = torch.load('model.pth')
model.eval()

class PredictionRequest(BaseModel):
    input_data: list[float]

@app.post("/predict")
async def predict(request: PredictionRequest):
    with torch.no_grad():
        output = model(torch.tensor(request.input_data))
    return {"prediction": output.tolist()}

@app.get("/health")
async def health():
    return {"status": "healthy"}
Build and push image:
# Build image
docker build -t my-ai-model:v1 .

# Tag for registry
docker tag my-ai-model:v1 gcr.io/my-project/my-ai-model:v1

# Push to registry
docker push gcr.io/my-project/my-ai-model:v1
Step 2: Create Kubernetes Deployment
Create deployment manifest:
# deployment.yaml
apiVersion: apps/v1
kind: Deployment
metadata:
  name: ai-model-deployment
  labels:
    app: ai-model
spec:
  replicas: 3
  selector:
    matchLabels:
      app: ai-model
  template:
    metadata:
      labels:
        app: ai-model
    spec:
      containers:
      - name: ai-model
        image: gcr.io/my-project/my-ai-model:v1
        ports:
        - containerPort: 8000
        resources:
          requests:
            memory: "2Gi"
            cpu: "1000m"
            nvidia.com/gpu: "1"
          limits:
            memory: "4Gi"
            cpu: "2000m"
            nvidia.com/gpu: "1"
        livenessProbe:
          httpGet:
            path: /health
            port: 8000
          initialDelaySeconds: 30
          periodSeconds: 10
        readinessProbe:
          httpGet:
            path: /health
            port: 8000
          initialDelaySeconds: 10
          periodSeconds: 5
Deploy to Kubernetes:
# Apply deployment
kubectl apply -f deployment.yaml

# Check deployment status
kubectl get deployments
kubectl describe deployment ai-model-deployment

# View pods
kubectl get pods -l app=ai-model
Step 3: Create Service
Expose your deployment:
# service.yaml
apiVersion: v1
kind: Service
metadata:
  name: ai-model-service
  labels:
    app: ai-model
spec:
  type: LoadBalancer
  selector:
    app: ai-model
  ports:
  - name: http
    protocol: TCP
    port: 80
    targetPort: 8000
Deploy service:
kubectl apply -f service.yaml
kubectl get service ai-model-service
Step 4: Configure Autoscaling
Enable automatic scaling:
# hpa.yaml
apiVersion: autoscaling/v2
kind: HorizontalPodAutoscaler
metadata:
  name: ai-model-hpa
spec:
  scaleTargetRef:
    apiVersion: apps/v1
    kind: Deployment
    name: ai-model-deployment
  minReplicas: 2
  maxReplicas: 10
  metrics:
  - type: Resource
    resource:
      name: cpu
      target:
        type: Utilization
        averageUtilization: 70
  - type: Resource
    resource:
      name: memory
      target:
        type: Utilization
        averageUtilization: 80
Step 5: Monitor and Logging
Setup monitoring:
# servicemonitor.yaml (for Prometheus)
apiVersion: monitoring.coreos.com/v1
kind: ServiceMonitor
metadata:
  name: ai-model-monitor
spec:
  selector:
    matchLabels:
      app: ai-model
  endpoints:
  - port: http
    interval: 30s
View logs:
# View logs for specific pod
kubectl logs pod-name

# Follow logs
kubectl logs -f pod-name

# View logs for all pods in deployment
kubectl logs -l app=ai-model --tail=100
Step 6: Rolling Updates
Update your model:
# Push new image
docker build -t my-ai-model:v2 .
docker push gcr.io/my-project/my-ai-model:v2

# Update deployment
kubectl set image deployment/ai-model-deployment \
  ai-model=gcr.io/my-project/my-ai-model:v2

# Check rollout status
kubectl rollout status deployment/ai-model-deployment

# Rollback if needed
kubectl rollout undo deployment/ai-model-deployment
Step 7: Advanced Configuration
Resource Quotas
apiVersion: v1
kind: ResourceQuota
metadata:
  name: compute-quota
spec:
  hard:
    requests.cpu: "50"
    requests.memory: "100Gi"
    limits.gpu: "10"
Node Selection
nodeSelector:
  gpu: "true"
  node-type: "ai-compute"
Kubernetes Commands Reference
# Deployment management
kubectl create deployment <name> --image=<image>
kubectl scale deployment <name> --replicas=<count>
kubectl delete deployment <name>

# Pod management
kubectl get pods
kubectl describe pod <pod-name>
kubectl logs <pod-name>
kubectl exec -it <pod-name> -- /bin/bash

# Service management
kubectl port-forward service/ai-model-service 8000:80

# Debugging
kubectl describe node <node-name>
kubectl top node
kubectl top pod
Common Issues and Solutions
Pod pending:
kubectl describe pod <pod-name> # Check eventsImagePullBackOff:
# Verify image exists and is accessible
docker push <image-name>
Out of memory:
# Increase memory requests/limits
kubectl set resources deployment <name> --requests=memory=4Gi
Best Practices
- Use specific image tags: Never use
latest - Resource limits: Always set requests and limits
- Health checks: Implement liveness and readiness probes
- Logging: Use structured logging
- Security: Use private registries, RBAC
- Monitoring: Track metrics and logs
- Backup: Regular backup of models
Conclusion
Kubernetes provides powerful orchestration for AI models. Follow this guide to deploy reliable, scalable ML systems.
Sources & References
Kubernetes & Orchestration
- Kubernetes Official Docs - https://kubernetes.io/docs/
- KServe Documentation - https://kserve.github.io/
- Docker Documentation - https://docs.docker.com/
ML Frameworks
- PyTorch Deployment - https://pytorch.org/serve/
- TensorFlow Serving - https://www.tensorflow.org/tfx/guide/serving
- FastAPI Framework - https://fastapi.tiangolo.com/
DevOps & MLOps
- MLOps.community - https://mlops.community/
- Cloud Native Computing Foundation - https://www.cncf.io/
- Kubeflow - https://www.kubeflow.org/
Related Articles

How to Implement AI System Monitoring and Alerts
Step-by-step guide to setting up comprehensive monitoring for AI systems in production.
How to Build Scalable AI Data Pipelines
Step-by-step guide to building production-ready data pipelines for machine learning.
How to Implement AI Governance Frameworks
Comprehensive guide to establishing governance policies and oversight for AI systems.